This is a comprehensive tutorial on Monorepos in JavaScript and TypeScript -- which is using state of the art tools for monorepo architectures in projects. You will learn about the following topics from this tutorial.
I've become passionate about monorepos, as they've transformed how I approach my work as a freelance developer and contributor to open-source projects. When I first adopted monorepos for JavaScript and TypeScript, it felt like a natural way to unify applications and packages. My goal with this tutorial is to share the lessons I've learned.
For the hands-on portion of this tutorial, we'll use React.js as our framework to create applications and shared packages, such as UI components. That said, you can easily adapt the concepts to your preferred framework.
Table of Contents
- What is a Monorepo
- Why use a Monorepo
- Structure of a Monorepo
- Monorepo Example
- Workspaces in Monorepos
- Monorepo Tools (Turborepo)
- Documentation in Monorepos
- Monorepos vs Polyrepos in Git
- Versioning with Monorepos (Changesets)
- Continuous Integration with Monorepos
- Monorepo Architecture
- Case Story: Monorepos as Incubators
What is a Monorepo
A monorepo is a project that contains smaller projects -- where each project can be anything from an individual application to a reusable package (e.g. functions, components, services). The practice of combining projects dates back to the early 2000s when it was referred to as a shared codebase.
The term "monorepo" stems from the words mono (single) and repo (repository). While the former is self-explanatory, the latter originates from version control systems (e.g., Git), where projects are hosted as repositories in either an n:n relationship (Polyrepo) or an n:1 relationship (Monorepo).
A monorepo is often mistaken for a monolith, but they are fundamentally different. A monolith refers to a single, tightly integrated application where all functionality resides in one codebase. In contrast, a monorepo is a single repository that houses multiple distinct projects -- such as applications, libraries, or services -- that remain modular and independent, enabling shared resources and streamlined collaboration without forcing them into a single application.
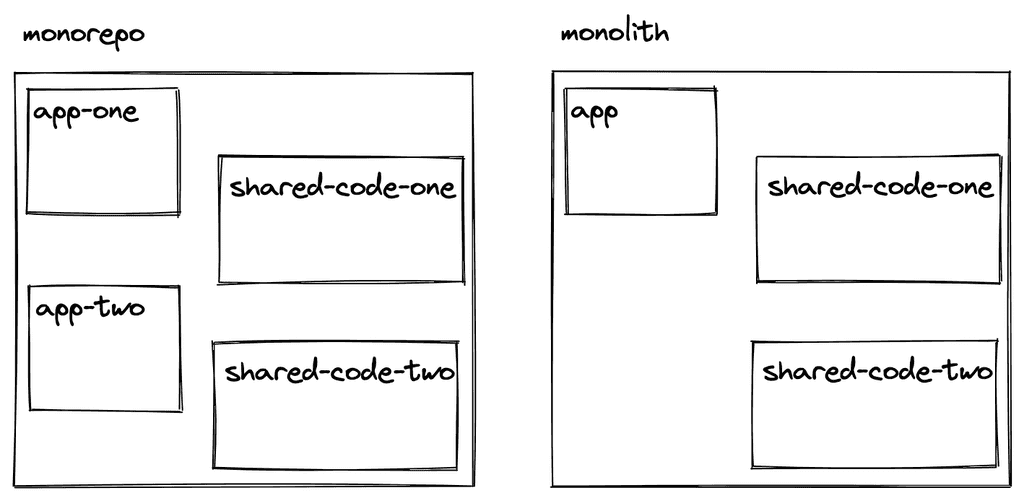
Monorepos are popular for large scale codebases used by large companies such as Google:
- "The Google codebase includes approximately one billion files and has a history of approximately 35 million commits spanning Google's entire 18-year existence." [2016]
- "Google's codebase is shared by more than 25,000 Google software developers from dozens of offices in countries around the world. On a typical workday, they commit 16,000 changes to the codebase, and another 24,000 changes are committed by automated systems." [2016]
However, these days monorepos become popular for any codebase which has multiple applications with a shared set of (in-house) packages ...
Why use a Monorepo
Using a monorepo for a large-scale codebase offers two significant advantages.
First, shared packages can be used across multiple applications locally without relying on an online registry (e.g. npm). This dramatically enhances the developer experience since everything resides within the same codebase, eliminating the need to update dependencies via third-party sources. Any updates to a shared package are instantly reflected in all dependent applications, streamlining development and reducing overhead.
Second, monorepos foster better collaboration across teams and projects. Developers working on different projects can contribute to other teams' codebases without juggling multiple repositories, enabling seamless cross-team collaboration. Monorepos also simplify accessibility by providing a consistent setup and promote flexible ownership of the source code. Additionally, they make large-scale refactoring across multiple projects more efficient and manageable.
Structure of a Monorepo
A monorepo can contain multiple applications (here: apps) whereas each application has access to shared set of packages. Bear in mind that this is already an opinionated monorepo structure, but it's a common one if you get started with monorepos:
- apps/--- app-one--- app-two- packages/--- package-one--- package-two--- package-three
A package, which is just a folder, can be anything from UI components (e.g. framework specific) over functions (e.g. utilities) to configuration (e.g. ESLint, TypeScript):
- apps/--- app-one--- app-two- packages/--- ui--- utilities--- eslint-config--- ts-config
A package can be a dependency of another package. For example, the ui package may use functions from the utilities package and therefore the ui package depends on the utilities package. Both, ui and utilities package, may use configuration from the other [name]-config packages.
The apps are usually not dependent on each other, instead they only opt-in packages. If packages depend on each other, a monorepo pipeline (see Monorepo Tools) can enforce scenarios like "start ui build only if the utilities build finished successfully".
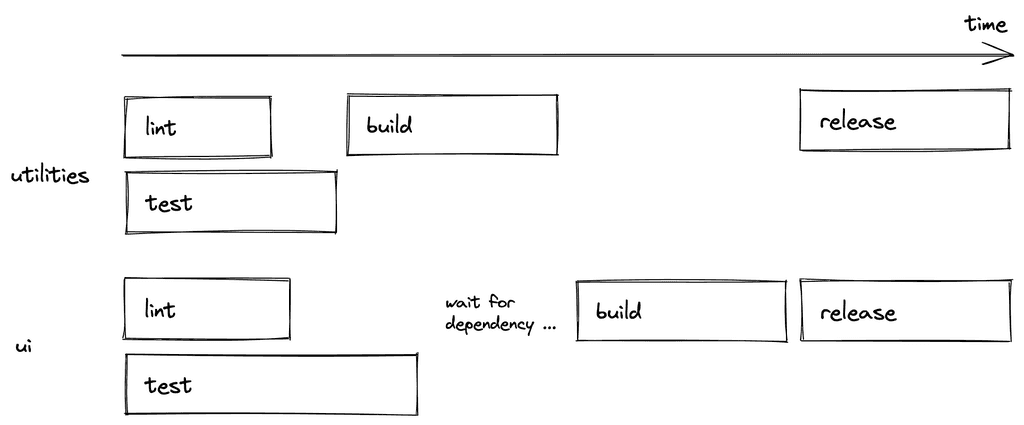
Since we are speaking about a JavaScript/TypeScript monorepo here, an app can be a JavaScript or TypeScript application whereas only the TS applications would make use of the shared ts-config package (or create their own config or use a mix of both).
Applications in apps don't have to use shared packages at all. It's opt-in and they can choose to use their internal implementations of UI components, functions, and configurations. However, if an application in apps decides to use a package from packages as dependency, they have to define it in their package.json file:
{"dependencies": {"ui": "*","utilities": "*","eslint-config": "*"},}
Applications in apps are their own entity and therefore can be anything from a SSR application (e.g. Next.js) to a CSR application (e.g. CRA/Vite).
In other words: applications in apps do not know about being an project in a monorepo, they just define dependencies. The monorepo decides then whether the dependency is taken from the monorepo (default) or as a the natural fallback from a registry (e.g. npm registry) (see Workspaces in Monorepos).
Reversely, this means that an application can be used without being part of the monorepo as well. The only requirement is that all its dependencies (here: ui, utilities, eslint-config) are published on a registry like npm, because when used as a standalone application there is no monorepo with shared dependencies anymore (see Versioning with Monorepos).
Monorepo Example
After all these learnings in theory about monorepos, we will walk through an example of a monorepo as a proof of concept. Therefore, we will create a monorepo with React applications (apps) which use a shared set of code (packages). However, none of the tools are tied to React, so you can adapt it to your own framework of choice.
We will not create a monorepo from scratch though, because it would involve too many steps that would make this whole topic difficult to follow. Instead we will be using a starter monorepo. While using it, I will walk you through all the implementation details.
Start off by cloning the monorepo starter to your local machine:
git clone git@github.com:bigstair-monorepo/monorepo.git
We are using yarn as alternative to npm here, not only for installing the dependencies, but also for using so-called workspaces later on. In the next section (see Workspaces in Monorepos), you will learn about workspaces and alternative tools for workspaces. For now, navigate into the repository and install all the dependencies with yarn:
cd monorepoyarn install
We will focus on the following content of the monorepo for now:
- apps/--- docs- packages/--- bigstair-core--- bigstair-map--- eslint-config-bigstair--- ts-config-bigstair
The monorepo comes with one "built-in" application called docs in apps for the documentation. Later we will integrate actual applications (see Workspaces in Monorepos) next to the documentation.
In addition, there are four packages -- whereas two packages are shared UI components (here: bigstair-core and bigstair-map) and two packages are shared configurations (here: eslint-config-bigstair and ts-config-bigstair).
We are dealing with a fake company called bigstair which becomes important later (see Versioning with Monorepos). For now, just think away the bigstair naming which may make it more approachable.
Furthermore, we will not put much focus on the ESLint and TypeScript configurations. You can check out later how they are reused in packages and apps, but what's important to us are the actual applications and the actual shared packages:
- apps/--- docs- packages/--- core--- map
For the two packages imagine any JavaScript/TypeScript code that should be consumed in our apps. For example, while the core package could have baseline UI components like buttons, dropdowns, and dialogs, the map package could have a reusable yet more complex Map component. From the apps directory's perspective, the separate packages are just like libraries solving different problems. After all, this only shows that the packages folder can scale vertically the same way as the apps folder.
To conclude this section, run the following command to run the apps/docs application. We will discuss later (see Monorepo Tools) why this command allows us to start a nested application in the apps folder in the first place:
yarn dev
You should see a Storybook that displays components from the core and map packages. In this case these components are only buttons (and not a map) for the sake of keeping it simple. If you check the core and map package's source code, you should find the implementation of these components:
import * as React from 'react';export interface ButtonProps {children: React.ReactNode;}export function Button(props: ButtonProps) {return <button>{props.children}</button>;}Button.displayName = 'Button';
Furthermore, the package.json files of both packages define a name property which are defined as dependencies in the docs application's package.json:
"dependencies": {"@bigstair/core": "*","@bigstair/map": "*","react": "18.0.0","react-dom": "18.0.0"},
If both packages would be available via the npm registry, the docs application could install it from there. However, as mentioned earlier, since we are working in a monorepo setup with workspaces (see Workspaces in Monorepos), the package.json file of the docs application checks first if these packages exist in the monorepo before using the npm registry as fallback.
Last, check the implementation details of the docs application. There you will see that it imports the packages like third-party dependencies even though they are packages in the monorepo:
import { Button } from '@bigstair/core';
This underpins again the fact that an application in apps doesn't know that it plays a part in a monorepo (see Incubating). If it wouldn't be in a monorepo (see Hatching), it would just install the dependencies from the npm registry.
Workspaces in Monorepos
A monorepo, in our case, consists of multiple apps/packages working together. In the background, a tool called workspaces enables us to create a folder structure where apps can use packages as dependencies. In our case, we are using yarn workspaces to accomplish our goal.
There are alternatives such as npm workspaces and pnpm workspaces too.
A yarn workspace gets defined the following way in the top-level package.json file:
"workspaces": ["packages/*","apps/*"],
Since we already anticipate that we have multiple apps and packages, we can just point to the folder path and use a wildcard as subpath. This way, every folder in apps/packages with a package.json file gets picked up.
Now, if an application from apps wants to include a package from packages, it just has to use the name property from the package's package.json file as dependency in its own package.json file (as we have seen before).
Note that the structure of having apps and packages is already opinionated at this point.
In practice, it's about multiple apps which can opt-in local packages as dependencies. However, so far we have only used the docs application which uses our monorepo's packages. Furthermore, the docs application is just there for documentation of these packages. What we want are actual applications using the shared packages.
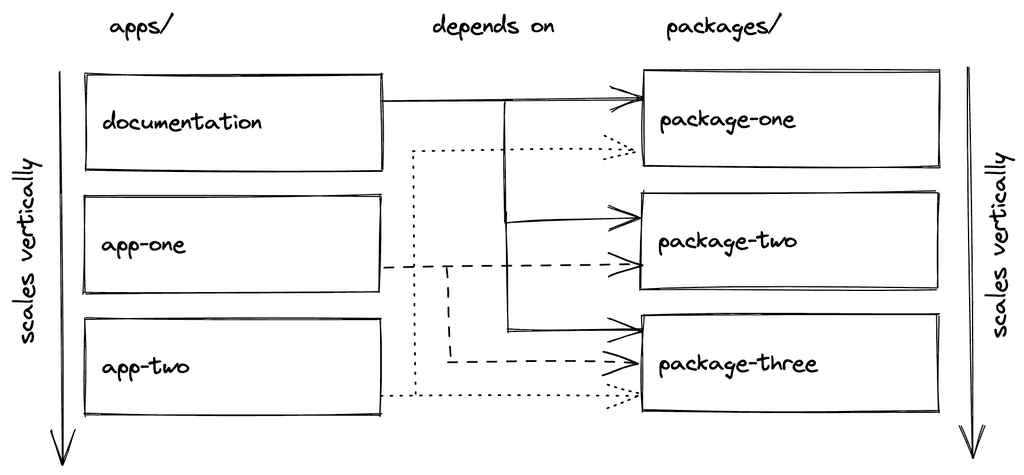
Navigate into the apps folder where we will clone two new applications into the monorepo. Afterward, navigate back again and install all new dependencies:
cd appsgit clone git@github.com:bigstair-monorepo/app-vite-js.gitgit clone git@github.com:bigstair-monorepo/app-vite-ts.gitcd ..yarn install
Installing all dependencies is needed here for two things:
- First, the new applications in apps need to install all their dependencies -- including the packages which they define as dependencies as well.
- Second, with two new nested workspaces coming in, there may be new dependencies between apps and packages that need to be resolved in order to have all workspace working together.
Now when you start all apps with yarn dev, you should see the Storybook coming up in addition to two new React applications which use components from the packages.
Both cloned applications are React applications bootstrapped with Vite. The only thing changed about the initial boilerplates is its dependencies in the package.json where it defines the packages from our workspaces as third-parties:
"dependencies": {"@bigstair/core": "*","@bigstair/map": "*",...}
Afterward, they just use the shared components the same way as we did in the docs:
import { Button } from '@bigstair/core';
Because we are working in a monorepo setup, to be more specific in workspace setup which enables this kind of linking between projects (here: apps and packages) in the first place, these dependencies are looked up from the workspaces before installing them from a registry like npm.
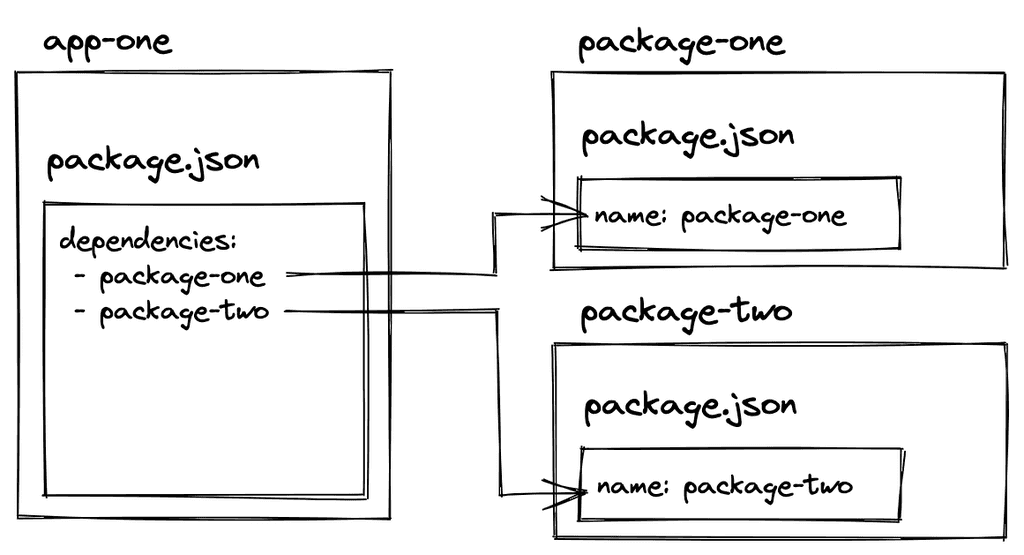
As you can see, any JavaScript or TypeScript application can be bootstrapped in the apps folder this way. Go ahead and create your own application, define any of the packages as dependency, yarn install everything, and use the shared components.
At this point, you already have seen the global package.json file in the top-level directory and local package.json files for each project in apps and packages. The top-level package.json file defines the workspaces in addition to global dependencies (e.g. eslint, prettier) which can be used in every nested workspace. In contrast, the nested package.json files only define dependencies which are needed in the actual project.
Monorepo Tools (Turborepo)
You have witnessed how workspaces already allow us to create a monorepo structure. However, while workspaces enable developers to link projects in a monorepo to each other, a dedicated monorepo tool comes with an improved developer experience.
You have already seen one of these DX improvements when typing:
yarn dev
Executing this command from the top-level folder starts all of the projects in the monorepo which have a dev script in their package.json file.
The same goes for several other commands, because they are defined at a top-level:
yarn lintyarn buildyarn clean
If you check the top-level package.json file, you will a bunch of overarching scripts:
"scripts": {"dev": "turbo run dev","lint": "turbo run lint","build": "turbo run build","clean": "turbo run clean",...},"devDependencies": {..."turbo": "latest"}
A monorepo tool called Turborepo allows us to define these scripts. Alternative monorepo tools are Lerna and Nx. Turborepo comes with several configurations that allow you to execute the scripts for its nested workspaces in parallel, in order, or filtered:
"scripts": {"dev": "turbo run dev --filter=\"docs\"",...},
In addition, you will have a turbo.json file to define a monorepo pipeline for all the scripts. For example, if one package has another package as dependency in the packages workspace, then one could define in the pipeline for the build script that the former package has to wait for the build of the latter package.

Last but not least, Turborepo comes with advanced caching capabilities for files which work locally (default) and remotely. You can opt-in caching any time. You can check out Turborepo's documentation here, because this walkthrough does not cover it.
Documentation in Monorepos
Because many monorepos come with applications which access a shared set of packages, it's already the perfect architecture to have one dedicated application for documentation purposes which also gets access to the packages.
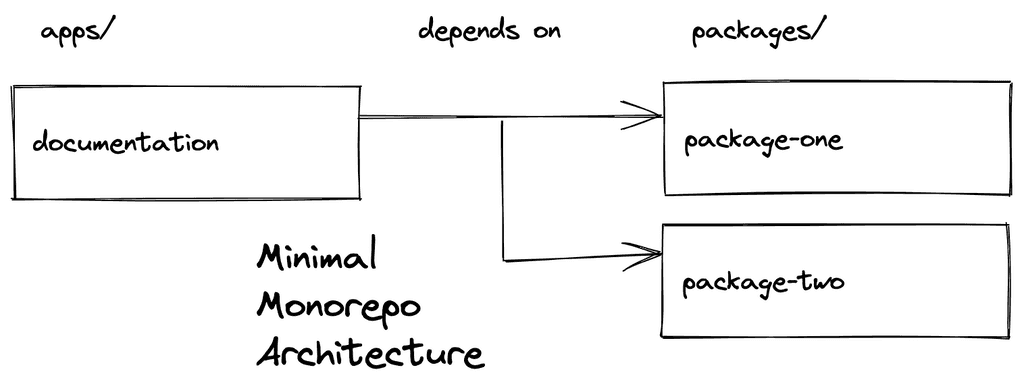
Our initial setup of the monorepo already came with a docs application which uses Storybook to document all of the package's UI components. However, if the shared packages are not UI components, you may want to have other tools for it.
From this "minimal monorepo architecture", which comes with shared packages, documentation of the shared packages, and a proof of concept that the monorepo architecture works by reusing the packages in the documentation, one can extend the structure by adding more applications or packages to it as we have done in the Workspaces in Monorepos section.
Monorepos vs Polyrepos in Git
If nothing speaks against it, one can host a monorepo with all its workspaces in a single Git repository. That's the prime definition of a monorepo after all. However, once a monorepo scales in size with multiple workspaces, there is maybe (!) the need (see Example: Monorepos as Incubators) for separating the monorepo into multiple Git repositories. In essence that's what we already did with the apps (except for docs) in this monorepo tutorial.
There may be various ways to move from a single Git repository to multiple Git repositories for a monorepo -- essentially creating a polyrepo in disguise as a monorepo. In our case, we just used a top-level .gitignore file which ignores two of the nested workspaces from the apps which should have their dedicated Git repository.
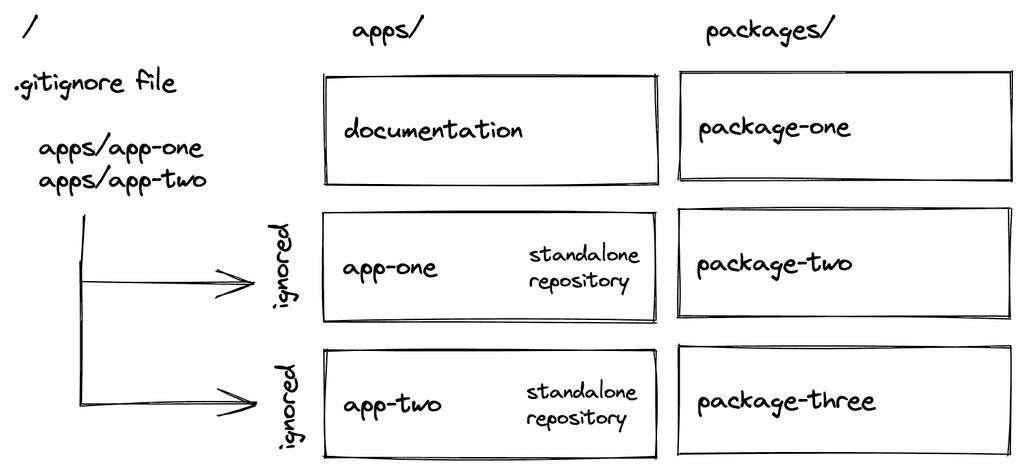
However, this way we always work on the latest version of all workspaces (here: apps and packages), because when cloning all nested workspaces into the monorepo or as standalone application, they just use the recent code. We get around this flaw when taking versioning into account next.
Versioning with Monorepos (Changesets)
Applying versions, especially to shared packages in a monorepo which may end up online in a package manager (e.g. npm registry) eventually, is not as straightforward as expected. There are multiple challenges like packages can depend on each other, there is more than one package to keep an eye on, packages are nested folders in packages, and each package has to have its own changelog and release process.
In a monorepo setup, the packages behave like dependencies, because the apps are using them from the workspace setup (and not the registry). However, if an application does not want to use the recent version of a package in a workspace, it can define a more specific version of it:
"dependencies": {"@bigstair/core": "1.0.0","@bigstair/map": "1.0.0",...}
In this case, if the version of the package in the workspace is different from the specified version, the install script will not use the workspace package but the registry instead. Therefore we need a way to create versions, changelogs, and releases for packages while developing the monorepo.
The changesets project is a popular tool for managing versions of multiple packages in a multi-package repositories (e.g. monorepo). Our monorepo setup already comes with an installation of changesets and scripts defined in the top-level package.json file. We will walk through each of these changesets scripts step by step:
"scripts": {..."changeset-create": "changeset","changeset-apply": "changeset version","release": "turbo run build && changeset publish"},
Versioning packages will include publishing them to a registry (e.g. npm). If you want to follow along, you need to perform the following steps as prerequisite:
- create an organization on npm which allows you to publish packages
- npm login on the command line
- use the name of your organization instead of
bigstairin the source code - verify with
yarn install && yarn devthat everything still works as expected
Another prerequisite before we can version a package: We need to change one of our packages first. Go into one of the UI packages and change the source code of the components. Afterward, the mission is to have the change reflected in the new version which gets published to npm.

First, run
yarn changeset-createwhich enables you to create a changelog for changed packages. The prompt walks you through selecting a package (use spacebar), choosing the semver increment (major, minor, patch), and writing the actual changelog. If you check your repository afterward withgit status, you will see the changed source code in addition to a newly created changelog file. If packages depend on each other, the linked packages will get a version bump too.Second, if the changelog file is okay, run
yarn changeset-applywhich applies the changelog and the version to the actual package. You can check again withgit statusandgit diffif everything looks as desired.Third, if everything looks okay, go ahead and release the updated packages to npm with
yarn release. After the release, verify on npm that your new version got published there.
Essentially that's everything to versioning your packages on your local machine. The next section takes it one step further by using continuous integration for the versioning (2) and publishing (3) steps which makes it more reliable and scalable for a team.
Continuous Integration with Monorepos
The complexity of the Continuous Integration (CI) of a monorepo depends on how many repositories get managed on a version control platform like GitHub. In our case, all packages are in the same repository (here they are part of the monorepo itself). Hence we only need to care about CI for this one repository, because in this section it's all about the release of the packages.
Our monorepo uses GitHub Actions for CI. Open the .github/workflows.release.yml file which presents the following content for the GitHub Action:
name: Releaseon:push:branches:- mainconcurrency: ${{ github.workflow }}-${{ github.ref }}jobs:release:name: Releaseruns-on: ubuntu-lateststeps:- name: Checkout Repositoryuses: actions/checkout@v2with:fetch-depth: 0- name: Setup Node.js 16.xuses: actions/setup-node@v2with:node-version: 16.x- name: Install Dependenciesrun: yarn install- name: Create Release Pull Request or Publish to npmid: changesetsuses: changesets/action@v1with:publish: yarn releaseenv:GITHUB_TOKEN: ${{ secrets.GITHUB_TOKEN }}NPM_TOKEN: ${{ secrets.NPM_TOKEN }}
Note: If this workflow should run on your own GitHub repository, you have to create a NPM_TOKEN on npm and use it as repository secret on GitHub. Furthermore, you need enable the "Allow GitHub Actions to create and approve pull requests" for your organization/repository too.

Now again, change a component in one of the packages. Afterward, use yarn changeset-create to create a changelog (and implicit semver version) locally. Next, push all your changes (source code change + changelog) to GitHub. From there the CI with GitHub actions takes over for your monorepo's packages. If the CI succeeds, it creates a new PR with the increased version and changelog. Once this PR gets merged, CI runs again and releases the package to npm.
Monorepo Architecture
Monorepos are becoming more popular these days, because they allow you to split your source code into multiple applications/packages (opinionated monorepo structure) while still being able to manage everything at one place. The first enabler for having a monorepo in the first place are Workspaces. In our case we have been using yarn workspaces, but npm and pnpm come with workspaces as well.
The second enabler are the overarching monorepo tools which allow one to run scripts in a more convenient way globally, to orchestrate scripts in a monorepo (e.g. pipelines in Turborepo), or to cache executed scripts locally/remotely. Turborepo is one popular contender in this space. Lerna and Nx are two alternatives to it.
If a monorepo is used in Git, one can optionally decide to split a single repository into multiple repositories (polyrepo in disguise as a monorepo). In our scenario we have been using a straightforward .gitignore file. However, there may be other solution to this problem like git submodules.
In the case of versioning, Changesets is a popular tool for creating changelogs, versions, and releases for a monorepo. It's the alternative to semantic release in the monorepo space. In the future it would be great to have semantic-release behaviour in changesets.
In conclusion, Workspaces, Turborepo, and Changesets are the perfect composition of monorepo tools to create, manage, and scale a monorepo in JavaScript/TypeScript.
Case Story: Monorepos as Incubators
In my recent job as a freelance frontend developer, I had to set up a monorepo for a company. The company is a software house which develops applications for other companies. Over the years, they have created packages (e.g. UI components) internally.
The goal for the monorepo: being able to develop applications for clients side by side while being able to use shared packages with a great DX. Rather than installing the packages from npm, we can just change them within the scope of the monorepo and see the changes reflected in the applications. Otherwise we would have to go through the whole release + install cycle when adjusting a UI library.
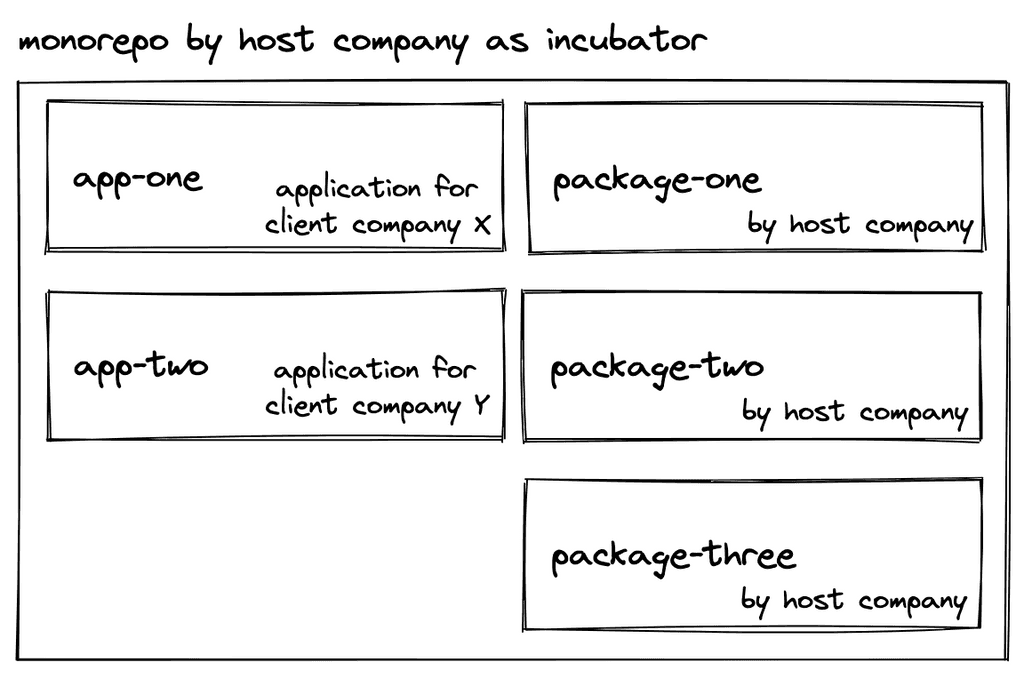
The process for incubating and hatching an application for a company is divided into two consecutive parts which I will explore in the following.
Incubating: When on-boarding a new client to the monorepo, we/they create a repository via git from where we clone it into our monorepo. From there, we can opt-in shared packages from the monorepo as dependencies. The client can clone the repository any time as standalone project (without having to rely on the monorepo) while being able to install all dependencies from the registry, because of the mandatory versioning of the shared packages.
Hatching: Once a client gets off-boarded, we set a final version to all dependencies in their project's package.json. From there, it's their responsibility to upgrade the packages. Hence the automatically generated changelog of in-house packages on our end if a client decides to upgrade one of them.
Monorepos streamline large-scale development by centralizing multiple applications and packages, enabling seamless collaboration, simplified dependency management, and efficient updates. Tools like Yarn Workspaces, Turborepo, and Changesets make monorepos scalable and maintainable, offering a unified approach to building and managing complex projects. With this tutorial, you're ready to implement a robust monorepo architecture.